https://www.bestcpmnetwork.com/wm8r0f4h?key=71e22323cafc6f23c987737c78d66ca2 Dan's Gardening and Birding Blog

Tuesday, September 15, 2015

It's Potato Time/Help Me Identify a Mystery Bird

Welcome back.

A few weeks ago I undertook the process of digging potatoes.  It's a fun activity, well at least I (and probably my fellow gardeners) think it is.  It's like hunting for buried treasure.  Some years the find is excellent, others not so much.

Last year I had a bumper crop of about 250 lbs, which will be hard to beat.  That was an all time record.   This year I planted fewer hills, plus the exceedingly wet June and first half of July seemed to affect the overall yield.

I tried a new variety of potato this year, along with some tired and true ones.  The new variety turned out to be quite the surprise,

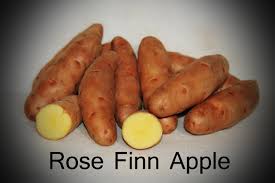
The seed potatoes I purchased were supposed to be Rose Finn Apple fingerlings, as can bee seen in my post on May 21, 2015 (http://dansgardening.blogspot.com/2015/05/planting-potatoes.html).  However based upon the appearance and some research I did, the variety turned out to be Red Thumb fingerlings. Both have rose colored skin, however Rose Finn apple has a yellow flesh, while Red thumb has a rose and white colored flesh.

At the time of harvest, I didn't take a photo of the flesh of these tubers, however below I have added one. Compare to the photo of Rose Finn Apple fingerlings.  Clearly, they were mislabeled,  They turned out to have delicious flavor, so I was pleasantly surprised.


Red Thumb Fingerlings 


Red Thumb


Potatoes should be dug when the vines start to die off.  This usually happens in August or September, depending on the variety.  If the vines are still thriving, the tubers are still growing.  Of course, if you get anxious for some early potatoes, they can be dug as "new potatoes" before they reach maturity.


Russet Burbank Potatoes

Once dug, potatoes need to be allowed to dry for at least a day before storing.  However, if exposed to light, they will turn green,  I typically lay them out on my garage floor on newspaper and cover them with a sheet or blanket.  The newspaper helps to absorb moisture from the soil still on the potatoes.


Russet Burbank Potatoes Drying

Once dry, they need to be stored in a cool, dry, dark place.  If you have an older home, the cellar may be an excellent place.  In my home, we have an old stone foundation.  The basement acts as a root cellar, since the temperature usually stays in the forties during the winter.  It never freezes since the furnace is down there, but stays cool which is great for potato storage.  It is pretty dark also, however I always cover them with an old blanket to ensure they are not exposed to light.


Yukon Gold
.


Red Thumb and Yukon Gold

In summary, the potato yield was fair this year.  Although I ended up with approximately 75 to 100 pounds, there was a higher percentage of small potatoes this year.  Nonetheless, the yield was plenty for our needs.


Finally, during the last several weeks, we have seen the bird below, but I'm not sure of the species.  It is migration time here in central New York State, so it very well could be a migratory bird.  It looks like a juvenile, which may be throwing me off track.  It almost looks like a gray flycatcher, but they are not found in the East as far as I know.  Any guesses?  Let me know.

As always, thanks for reading my blog.


Saturday, August 29, 2015

Harvest Photos - Heirloom Tomatoes and More

Welcome back.  It's been a while since my last post, as the summer is flying by and coming to a close. Labor Day is right around the corner.

This is the time of the gardening season when all the work pays off.  Overall it's been a good growing season, with a few exceptions.   The extremely wet month of June and early July had an adverse affect on some of the plants, mainly pumpkins and beans.  Some of the pumpkin plants rotted while the remaining ones didn't grow at the normal pace.  The bean plants din't grow well either, only getting about 6 or 8 inches high (normally at least 12 to 14 inches).  The bean crop was very sparse.  The pumpkins have recovered somewhat but there are only a few forming and they are only about half grown at this point.

However, the garden overall has also yielded many nice crops as I discussed in my last post on August 7, 2015 (http://dansgardening.blogspot.com/2015/08/harvest-time-is-heremid-season-garden.html).  We have continued to enjoy the many edible benefits of gardening over the last few weeks:


Abundant Harvest 


Italian Kale


Portugal Hot Peppers


Grape Tomatoes on the Vine


Red Thumb Fingerling Potatoes


Heirloom Tomatoes


Beautiful Sunflowers


Heirlooms on the Vine

In my next post I will talk about digging and storing potatoes.  Also, the newly planted radishes, kale and lettuce are making good progress towards a fall harvest.

As always, thanks for reading.


Friday, August 7, 2015

Harvest Time is Here/Mid Season Garden Clean Up

Welcome back.

Although it's hard to believe. August is now here and the garden is nearing it's peak.  After the very wet June and first half of July, it has finally started to dry out.  The garden is actually nearing the point where it may need watering.  I haven't watered since May, except for when I first transplanted plants or planted seeds.

As you have read in my previous posts, we have been enjoying many vegetables so far this season including lettuce, radishes, kale, peas, peppers, beans, and squash.

I finally have stated picking tomatoes.  This is always a much anticipated moment especially if you are a tomato lover. I have been picking grape tomatoes for the last several weeks.  Today I picked a few heirloom tomatoes as well that are not quite ripe but will finish ripening in the house.  The plants have been affected by blight again this year, but remain healthy enough at this point where I should be able to enjoy a decent crop.

Zucchini, Round Yellow Squash, Grape and Heirloom Tomatoes


Sample of Vegetables Picked


Grape Tomatoes On the Vine

This week I have also been doing some mid season cleanup.  In addition to a thorough weeding job, I pulled out the peas and radishes, and also some romaine lettuce plants which had bolted in the heat to about 3 feet tall.   It is always a good idea to try to keep the garden tidy as the season progresses. It's not absolutely necessary but it makes the fall cleanup process much easier.  I don't always get time, but luckily I did this week.

Another advantage to the clean up is creating space to plant some late season/fall crops.  Over the next few weeks I will plant some lettuce/greens to enjoy in September.   As the days get cooler, lettuce/greens will thrive much like do at the beginning of the growing season.


Cleaning Up the Peas


Portugal Peppers (Hot)


Sunflower Delight


Rainbow's End

In my next post I will talk about harvesting some onions and planting some fall crops.  As always, thanks for reading my blog.


Saturday, July 18, 2015

Killdeer Sighting/Planting Perennial Flowers

Welcome back.  thanks as always for reading my blog.

The wet summer pattern continues.  In the last six weeks (since June 1st), we have received 12 inches of rain here in central New York State.  It's hard to believe that I was watering the garden on a regular basis in May when I was first starting seeds and plants.

Finally, as promised, a couple of photos of Killdeer that I spotted on the lawn a few weeks ago.  These are interesting birds, a member of the plover family.  They are known for there signature run-stop, run-stop behavior as they try to stir up bugs to eat as they run.  The day I took these photos there were 3 of them on the lawn.  These birds nest on the ground.


Killdeer On The Run


Killdeer With It's Distinctive Markings


Last summer in my post on July 25, 2014 (https://www.blogger.com/blogger.g?blogID=7818050104445836783#editor/target=post;postID=5498612957775284819;onPublishedMenu=allposts;onClosedMenu=allposts;postNum=35;src=link), I discussed how I transformed an area in our yard where once a tall blue spruce stood into a perennial bed.  As promised, I will share photos of how the bed has progressed over the last year.

Over the winter, 3 or 4 of the perennials didn't survive, which sometimes happens especially during the first winter the plants have to endure the cold.  Of course last winter was especially brutal, so I'm surprised that most of the flowers survived.  Like vegetable gardening, maintaining a flower bed is also continuous work.  But once established, they provide much enjoyment.

I recently also added a few more perennial flowers and a dwarf blue spruce tree.  The finishing touch is adding mulch, as I used dark brown this.  We switched to dark brown mulch in all the beds this year.  We previously used the naturally color, but think the dark brown looks better.


Dwarf Alberta Spruce Will Become the Centerpiece


Phlox, Coneflowers, Coreopsis


Purple Salvia

Shifting to the front of our home, I recently removed a 25 plus year old holly bush that had died a couple of years ago over the winter.  It showed some signs of life, so I gave it some time to see if it would grow back.  However, the progress was extremely slow, so I decided to remove it.

This wasn't an easy core as I ended up using my old garden tractor to pull it out with a chain.  After multiple tugs, along with some chopping of the roots, it finally gave in!


Pulling Out The Holly Bush

Having a fairly large space to fill, we decided to plant a Japanese Maple tree as the centerpiece, adding more perennial flowers around the tree. 


Japanese Maple, Phlox, Daisies


Coneflowers


Coreopsis


In my next post, a vegetable garden update. 

Saturday, July 4, 2015

Simply Photos - Garden Update and Happy 4th of July

Welcome back.  Time is flying by as summer is officially underway and today is already the 4th of July.  It seems like just a few weeks ago the snow had melted and I was preparing the garden for the season.

June ended up being one of the wettest on record hear in the Northeast.  I recorded 7.5 inches of rain in my yard for the month, while other nearby areas in central New York state received up to 12 inches.

This week I will post just photos to bring you up to date on my garden progress.  Despite the wet conditions, most everything seems to be doing quite well.  To date we have been enjoying radishes, loose leaf and romaine lettuce, kale, scallions, and snap peas.

Enjoy the photos.


Oregon Sugar Pod II Peas - Bumper Crop


Fresh Snow Peas


Thriving Pea Plants


Loose Leaf Lettuce Blend and Romaine Hearts

Radish Blend (Park Seed Beauty Blend)


Potatoes

Using Straw as Mulch

Kale (Dwarf Blue Scottish Curly), Romaine Lettuce, Tomatoes

Thank you for visiting my blob, and happy 4th of July.

In my next post, a Killdeer sighting in my yard.


Monday, June 15, 2015

Planting Cucumbers and Squash/Hilling Potatoes

Welcome back my fellow gardeners.

After a very dry spring through May, June is turning out to be a wet month thus far.  So far we've received 4.5 inches of rain in June.  Additional rain at this point may start to do more harm to the garden than good.

A few weeks ago I planted cucumbers and squash.  In years past I almost always started these from seed.  This year in an effort to enjoy yields sooner, I purchased plants.  One disadvantage of purchasing plants is that you may not be able to find the exact varieties you prefer.  For example, I purchased picking and burpless cucumbers, but they were not labelled as to the specific variety.

In addition to the pickling and burpless varieties mentioned above , I also purchased Marketmore, which is a well known slicing variety.  I planted both the cucumbers and squash in hills of composted manure.

Regarding squash, I planted yellow, zucchini, and "Eight Ball" round green squash.  The Eight Ball squash can be used for stuffing, baking, etc.  In addition, I also planted butternut squash in my "auxiliary" garden down behind the pond. This is a small garden I use an an overflow to add a few items that won't fit in the main gardens.

I plant pumpkins using the same technique.  I will show the progress of the pumpkins and gourds in future posts.  They were also planted about 2 weeks ago and are growing nicely.


Mixing in Composted Manure With Squash Plants


.
Cucumbers and Squash

Butternut Squash in the Auxiliary Garden

In my post on May 21, 2015 (http://dansgardening.blogspot.com/2015/05/planting-potatoes.html), I discussed planting potatoes.  In addition to the varieties listed in that post, I also recently planted a few hills of red potatoes.  Reds are always good in the fall to use in soups and stews as they are a good boiling variety.

The potatoes are growing quite nicely thus far this season, with one slight problem common to most gardeners.  Weeds.  For some reason the weeds sprouted quickly in the potato patch and had to be controlled.  My solution is two step process.

First of all, potatoes need to be "hilled" once they are established and are about 4 to 6 inches high. Hilling is simply the process of "piling" up dirt around the the vines to give the potatoes plenty of cultivated soil to develop without being exposed to sunlight.  Potatoes need to stay underground, otherwise they will turn green.

The second step is to add mulch to prevent weeds from re-growing, and also to help keep the moisture in during the entire season.  I normally use either chopped hay or grass clippings.

Hilling Potatoes

Grass Clippings For Mulching

Mulching the Potato Plants

Stay tuned for more garden updates.  With this warm weather and plenty of moisture, all the plants are growing quickly.  I will try to keep up to dates with my posts.

Thanks for reading and happy gardening.


Wednesday, June 3, 2015

Planting Heirloom Tomatoes, Peppers, Brussels Sprouts

Welcome back, and thanks as always for reading.

On Memorial Day and the day following I got a chance to plant my heirloom tomatoes that I started from seed.  For more information on the varieties,etc., see my post of April 3, 2015 (http://dansgardening.blogspot.com/2015/04/starting-heirloom-tomatoesfirst-robins.html).  The weather was ideal, as these days were very summer like.

This year I didn't start peppers from seed, so I purchased some nice plants.  I bought them at a flea market that we visited while staying in Vermont for the weekend.  I also picked up three nice grape tomato plants and Brussels sprouts plants also.

Normally I start many varieties of tomatoes and hot and sweet peppers.  I was trying to keep things a little simpler this year.   I did of course start onions, scallions, and leeks from seed this Spring as well as some vegetables using the winter sowing technique.  If you didn't get a chance to see my post on winter sowing, it was published on February 20, 2015 (http://dansgardening.blogspot.com/2015/02/its-seed-buying-timewinter-sowing.html).  There are also additional posts showing the results of the winter sowing and also the tending of the tomato plants.  Winter sowing is a very interesting technique and I have had good results over the last two years.


Heirloom Tomato Plants

Planting tomatoes in the garden is fairly simple.  Of course, I had already prepared the garden soil by rototilling.  For information on soil preparation, see my post of May 5, 2015 (http://dansgardening.blogspot.com/2015/05/transplanting-heirloom-tomatoesplanting.html) .  I recommend mixing in some composted manure or home made compost to give the plants a boost.  Of course you can always add a fertilizer such as Miracle-Gro also.


Since the tomato plants were in peat pots, I removed the bottom of the pot to allow the roots to be exposed.  Even if this step isn't done, the peat pots will break down fairly quickly.  Removing the bottom just helps them to get a faster start.


Planting Heirloom Tomatoes


Planting Heirloom Tomatoes


Planting Grape Tomato


Tomato Plants Protected With Cages/Wood Shingles 

Next I planted the pepper plants.  I purchased Portugal Hot peppers, Jalepeno (hot), Cubanelle (sweet), and Red Bell Peppers (sweet).  I also used wood shingles as I did with the tomatoes to protect the plants from wind and sun at least for a week or so.  This will help the plants during the hardening off phase after being transplanted into the garden.


Pepper Plants


Finally, I planted the Brussels Sprouts plants I purchased.  Each one of these plants provide an amazing yield, so 6 plants will be more than enough for our family.


Brussels Sprouts


Upper Garden


Thanks again for visiting my blog.  Stay tuned for more garden updates.  My next post will involve the planting of pumpkins, gourds, cucumbers and squash.