https://www.bestcpmnetwork.com/wm8r0f4h?key=71e22323cafc6f23c987737c78d66ca2 Dan's Gardening and Birding Blog

Wednesday, June 18, 2014

Potato Update Sweet and Otherwise

Welcome back,

This year I decided to plant a few sweet potatoes as an experiment to see how well they would grow in this area.  I have only tried to grow them once before, quite a few years ago, without success.  I may have planted them too early in the season as sweet potato plants are sensitive to cool temperatures.

I ordered them from the Jung Seed Company.  The variety I decided to try is Centennial, described as follows:

America's leading sweet potato for northern climates. Sturdy field-grown plants mature early before frosts. Bright copper skin with deep orange flesh. Fine-grained, moist and delicious when baked.


Centennial Sweet Potato

Unlike regular potatoes that are planted as seed potatoes, sweet potatoes are started as plants.  The live plants are shipped at the time that is appropriate for planting in your area.  They may be wilted when you receive them but this is normal.  The plants are very hardy and will survive the shipping process.

I planted them in a small garden I have down behind our pond.  It's just a little spot where I usually plant a few extra tomatoes (imagine that!) or whatever i have extra of.

I planted them about 6 inches deep and about a foot apart.  I then gave them adequate water and protected them with wood shingles until they get adjusted to the hot sun and outside conditions.


Sweet Potato Plants

The Plot is Ready

Sweet Potato Plants


All Finished

Back in the main garden, the "regular" potatoes are coming up nicely.  An important step in growing potatoes is "hilling."  It is a process of loosening the dirt around the plants, then mounding up the dirt to a height of about 8 to12 inches to give the potatoes plenty of soil to develop in without being exposed to the sun.  If the plants aren't hilled properly, many of the potatoes will be above ground and will turn green as they are exposed to light.

Hilling the Potatoes

The final step is to add grass clippings or some other mulching material,  This isn't absolutely necessary but it cuts down on weeding tremendously, holds the moisture in the ground, plus keeps the soil from baking hard in the sun.

Mulching With Grass Clippings

Note:  I ended up planting a third variety of potato in addition to Kennebec and Yukon Gold.  For more information on these two varieties and planting, see my post of May 30, 2014 (http://dansgardening.blogspot.com/2014/05/in-with-potatoes.html).

The new variety I am trying this year is an heirloom called German Butterball.  I ordered these from the Jung Seed Company.

German Butterball Potato
This superb potato says 'butter' and it's better than excellent. It has yellow, slightly flaky, melt-in-your-mouth flesh with butter-rich flavor. One taste and you'll know why it won first place in Rodale's Organic Gardening 'Taste-Off' contest. Disease-resistant plants produce high yields of large, round to oblong tubers with lightly netted golden skin. A good keeper. Late season.

I am looking forward to trying these!

In my next post I will talk about planting peppers and an update on all of the delicious greens we are enjoying.

Thanks for reading.


Tuesday, June 10, 2014

The Tomatoes Are Planted/Killdeer Photo

Welcome back.

Over the last few weeks I have been gradually planting what I consider to be the "main attraction" in my garden: the tomatoes.  All the tomato lovers out there will know what I mean.


Each year I look forward to starting the plants from seed, nursing them along until they reach garden size, and ultimately transplanting them into the garden. It's fun to chose the varieties you like and to experiment with different ones, especially now in the age of heirloom tomatoes.

Planting tomatoes is a fairly simple process, now that the soil has been prepared for some time now.  One of the most important factors to consider when planting tomatoes is temperature.  After many years of experience, I have learned not to plant them too early in the season.  It is better to wait a few weeks to ensure that the weather will remain consistently warm for the season.  Here in central NY State, it is best to wait until late May or early June.  

The first step is to dig small holes about six inches deep in which to place the plants.  My plants are currently in 3 inch peat pots, so the hole should be large enough to accommodate those, and deep enough to provide enough support to the stems.  This year I am placing composted manure in the holes to mix with the soil.

Preparing to Plant Tomatoes


Mixing in Composted Manure

Next, simply place the tomato plant in the hole.  I normally peel off the bottom of the peat pot to make it easier for the roots to grow.  This step isn't necessary as the roots will grow through the peat pot as it decomposes in the soil.


Make sure to fill in enough dirt around the plants to ensure adequate support of the stems. Also be sure to water them to ease the shock of transplanting.

To provide additional support, I use tomato cages that support the plants as they grow.  Proper support is especially important as the pants develop tomatoes.  They become heavy and will topple if not supported. The tomato cages are fairly inexpensive and can be use for many seasons.


Placing Tomato Cages

Another step that I add to ensure that the plants are protected is placing wood shingles around them. This is an old school technique that provides both shading and wind protection for the new transplants.  I typically will remove these after a couple of weeks.  I first talked about using the wood shingles in my post on May 10, 2014 (http://dansgardening.blogspot.com/2014/05/planting-more-early-season.html).


Wood Shingle Protection

The final step is to add grass clippings or some form of mulch around the plants.  This step is optional of course, but I find it cuts down tremendously on the weeding and also keeps the ground moist throughout the summer.


The Tomatoes Are Planted!

By now you are probably wondering which tomato varieties I transplanted.  The varieties I started this year from seed were detailed in my posts on March 25, 2014 (http://dansgardening.blogspot.com/2014/03/its-tomato-starting-time.html) and April 7, 2014 (http://dansgardening.blogspot.com/2014/04/planting-more-tomatoes-more-heirlooms.html).

The actual varieties that I have transplanted thus far are:

Artisan from the Jung Seed Company:

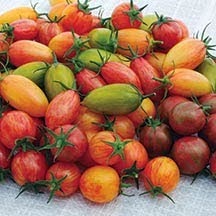
Artisan Tomaoes


Unique Appearance - Exceptional Flavor
Whether you're a master chef or a home cook, you'll love all the options these tomatoes bring to the table. The breeders of Artisan's focused on combining excellent flavor with unique colors and shapes. The results are these beautiful and tasty, round and elongated, striped and blushed cherry-type fruits that range from 1.5 to 2 inches in size, resist cracking and keep well. Indeterminate plants stay healthy and extremely productive over an extended period.


Grappoli Carbarino, an Italian bunching and paste tomato:


Grappoli Carbarino


Heirloom Rainbow Blend, from Park Seeds:


Contains Aunt Ruby's German Green, Dixie Golden Giant, Black from Tula, Brandywine Red, Big Rainbow, and Cherokee Purple.

Cherokee Purple:

Cherokee Purple - an old Cherokee Indian heirloom, pre-1890 variety; beautiful deep dusky purple-pink color, superb sweet flavor, and very large sized fruit. Try this one for real old-time tomato flavor.

Big Rainbow:


Big Rainbow - the flesh inside is marbled with red in the bottom half of the fruit. It has a big, lumpy beefsteak shape with a very mild and sweet flavor. It's a knockout on a platter with slices of other tomato varieties. The large fruits (often 22 oz.) are borne on tall plants.

If I find room in the garden I may try to squeeze a few more plants in!  However, I'm rapidly running out of gardening space as is usually the case every year.

Finally, as promised, a photo of a Killdeer that I spotted on the lawn last weekend.  These are interesting birds, a member of the plover family.  They are know for there signature run-stop, run-stop behavior as they try to stir up bugs to eat as they run.  We usually have a pair every summer.

Killdeer


Until next time.  Thanks for reading.


Wednesday, June 4, 2014

Planting Cucumbers/A Visit From Turkey Vultures

Welcome back.  I hope your garden is growing well.  So far this year mine is coming along nicely, as the weather has been favorable so far this Spring.

On May 23, 2014, I started my gardening adventures with planting cucumbers from seed.  We use a fair amount of them during the summer in salads and pickles.  So this year I planted 4 varieties.

The first is an heirloom variety called lemon cucumber from Burpee (also available from other sources).  I have grown these for several years and I keep returning to them since they are so good.:

Lemon Cucumber (www.burpee.com)

Lemon yellow cucumbers are tender and sweet, excellent for salads and pickling.
Don't be fooled by this heirloom's unusual shape—these bright yellow balls are excellent for salads and pickling. They have a clean, crisp taste and are never bitter. Normal-sized vines yield heavily and for a long time.
The other 3 varieties I purchased at a local farm store (seeds).  They included Marketmore, White Spine, and a burpless cucumber.

Marketmore

A favorite slicer for the home garden. These long, slender, dark green cucumbers have been the standard for American slicing cucumbers in the Northeast.  Resistant to scab, cucumber mosaic virus and mildews.


White Spine

White Spine Cucumber is a classic slicing variety from which many other newer slicers have been bred; this variety was developed and grown before 1800. Fruits are medium green, often lighter at one end, with white spines, and are usually around 7-8 inches in length. May be used for pickling if the fruits are picked very small.


Burpless 

Burpless cucumbers, both American and Asian types, contain low or no cucurbitacin, the compound that causes bitterness and increases one's susceptibility to 'burping' after eating the fruits

I normally plant cucumbers in hills, however this year I decided to try using a fence to allow them to climb. The fence I am using is about 30 inches high which should be adequate.  This will actually save space in the garden, compared to the traditional hill planting method since the plants will climb as opposed to crawl:


Cucumber Fence

I prepared the area by loosening the soil with a hoe.  Of course I previously had rototilled, some areas more than once since the soil over time begins to compact again.  I then added a layer of composted cow manure which I am using more extensively this year.  I talked about this in more detail in my post on May 17, 2014 (http://dansgardening.blogspot.com/2014/05/transplanting-onion-and-leek.html).

Then I used a rake to level the area and partially mix the compost with the soil.  The fence simply pushes into the soil and is hinged so it can be installed straight or at various angles.  I chose the angled approach to fit even more plants in the same amount of space.

I then laid the seeds on top of the soil making sure to remember which varieties are planted along each section of fence.  I can usually remember, but it also is a good idea to label which plants are which.

Cucumber Seeds Ready to Plant


Cucumber Seeds Ready to be Covered

Finally, simply press the seeds into the soil to a depth of about one inch, making sure that they are covered properly,  Usually, gently tamping the soil with your hand will ensure this.

As promised, last weekend we were visited by some turkey vultures in our neighbor's field.  He had just finished the first cutting of hay and the vultures discovered a treat there.  For those of you who have never seen these birds, they are definitely creepy, although they are fascinating in their own right.  I manged to get a few photos, although they are not the best due to the distance from our house and the size of my zoom lens:

Turkey Vultures

Turkey Vultures

Until next time.


Friday, May 30, 2014

In With the Potatoes

Welcome back.  I hope you are enjoying my blog and learning useful gardening and birding information also. Feel free to ask any questions you might have.

Last week I planted potatoes.  I love growing them and we usually end up with enough to last most of the winter.  As a rule I try to pick varieties that store well.

In order to grow potatoes you will need quite a bit of garden space.  I have expanded my gardens over the years so I have enough space.  They are actually simple to grow. They do require some work initially, but it usually pays off quite nicely.

When growing potatoes, it is important that the soil is well cultivated, to allow the potatoes to grow and develop properly,  If the soil is packed and hard, the result will be a poor crop.  Good cultivation is important for all vegetables, however for potatoes it it especially helpful.

The first step is to make the rows.  This is probably the hardest step when planting potatoes.  I make trenches about 4 to 6 inches deep using a hoe.  The spacing between the rows should be about 2 feet, more is even better if you have the garden space.

Potato Trench


In my garden this year, I was able to make 5 rows, each about 25 feet long:


Potato Trenches

The next step is to cut the potato sets into pieces so that there are at least 2 eyes per piece.   For those who don't know, the potato eyes are where the sprouts emerge.  Some of the eyes may already be sprouting, others are just barley visible.  I usually can get at least 2 pieces per potato set, sometimes 3.  If you end up with pieces with just one eye, simply plant 2 pieces for that hill.


Potato Set With Eyes (Sprouts)


Potato Sets Cut Into Planing Pieces


Now simply place the potato pieces in the trenches about 12 to 14 inches apart:


Planted Potatoes

You will notice that in some case I use 2 or 3 pieces per hill. As I mentioned above, this is to ensure that there are 2 to 3 eyes per hill.

Finally, cover up the potatoes with only about 2 to 3 inches of soil.  I don't completely fill in the trenches at this point to allow more moisture and warmth to reach them, which will allow them to sprout faster.  Once the plants have sprouted and reach around 6 inches high, then I will build up more dirt around the plants. This technique is called "hilling" and will be covered in a future posts

Covering the potatoes

This year I planted 2 varieties thus far.  The first is Kennebec, a great all purpose mid season potato that stores well.  It matures in about 80 days.

The second is Yukon Gold, which is also a good storage potato known for it's yellow flesh.  This variety matures in about 70 to 90 days, and is great for baking, although it is very good also for boiling or potato salads.

Until next time.  As always thanks for reading.

Friday, May 23, 2014

Garden Update/Tomato Plants/Nice Red-Winged Blackbird Photo

Welcome back.

As promised I am writing tonight about the vegetable garden progress.  It is slowly but surely coming together.  A garden is always a work in progress as it takes continual work to keep it running.  That is the fun of it for me as I find it very relaxing.  There is always something to do if you want to venture out "in the garden".

The early season vegetables are growing nicely.  The Oregon Sugar Pod Peas that I planted in late April (http://dansgardening.blogspot.com/2014/05/planting-peasa-visit-from-great-blue.html) are about an inch high at this point:

Oregon Sugar Pod Peas

The red serpent lettuce that I planted using the winter sowing technique(http://dansgardening.blogspot.com/2014/02/more-winter-sowingseed-starting-supplies.html) and the Brussels sprout plants which I purchased locally are also progressing well:

Red Serpent Lettuce/Brussels Sprouts

The wide rows that I planted (http://dansgardening.blogspot.com/2014/05/planting-more-early-season.html) which include spinach, Swiss chard, radishes, and the various types of lettuces that I planted are starting to become established.  Although the plants are thin in spots, they will quickly fill in as they grow and also as I am able to cultivate around them to loosen the soil.  In a few weeks this will look totally different.

Assorted Lettuces/Swiss Chard/Spinach/Radishes

In my last post I wrote about composting manure and the good results I had last summer growing pumpkins and gourds using this compost.  Last fall I disposed of the pumpkins and gourds right on the composted manure that was leftover.  This spring I cleaned out the remaining pieces of pumpkins/gourds, leaving the seeds laying on the surface of the compost. I then covered the seeds with about an inch of composted manure.

I remember my Mom & Dad getting good results with "manure pile" pumpkins and gourds.  These usually grew better than the ones planted in the garden.  So far this spring I am seeing good results as quite a few seeds are already sprouting:

Manure Pile Pumpkins & Gourds


Manure Pile Pumpkins/Gourds

Last but not least, the tomato and pepper plants are also growing nicely in the greenhouse on my porch.  I most likely will start transplanting them into the garden in the next few weeks, since the danger of frost should be dwindling:

Tomato Plants in the Greenhouse

Pepper Plants (Foreground) & Tomato Plants

As an added bonus, I was able to take a nice photo of a red-winged blackbird at the feeder this week.  I have found these birds very difficult to photograph since they will fly away with the least little movement.

Red-Winged Blackbird


Until next time.  Thanks again for reading and for your support.


Clouds at Sunset


Saturday, May 17, 2014

Transplanting Onion and Leek Plants/Composting Manure

Welcome back and as always thank you for reading.

The planting of the Spring vegetables continues as about 10 days ago on May 8th, I transplanted some sweet Spanish onion and Lincoln leek plants that I had started from seed.

As you may recall, I detailed the planting of the onion and leek plants in my post on March 8, 2014 (http://dansgardening.blogspot.com/2014/03/its-time-to-start-some-vegetables.html).

The transplanting process for these is pretty simple.  The main thing is to be gentle while removing and separating the plants from the original planting container.  I always water them in the original container before removing which allows as much soil as possible to cling to the roots.

I recommend using a string to keep the row straight.  The onions and leeks were planted about one inch deep:


Yellow Sweet Spanish Onions

Yellow Sweet Spanish Onions

Lincoln Leeks

Be sure to keep the transplants watered, especially for the first week after planting, since the roots are very shallow and it's always a shock to plants after transplanting.

Composting Manure:

In past years, I normally would put cow manure (from the farm right across the road) on the garden in the very early spring.  It would then get rototilled into the soil in April, but it never seemed like it had enough time to break down.

Last year I started a  different process which I think works better. Actually I discovered this by accident.  I had left part of my manure pile unused from the previous spring. What I found was a gardener's treasure: compost.  After sitting for a year, the manure turned to a beautiful black compost.  So last summer I used the compost to plant pumpkins and gourds, creating a hill of the compost to plant the seeds in.  The results were one of the best pumpkin and gourd crops that I had in years.  So this spring I have already made some compost hills that I will use for planting pumpkins.

Composted Manure

Compost Hills


In my next post, I will have updated garden photos as the lettuce, radishes, Swiss chard, etc. have sprouted and are coming along nicely.  Also an update on my tomato  and pepper plants which are rapidly growing in the green house.

Also, I will write a future post on the bird houses I have in my yard (10 total), and an update on the birds nesting in them.

Until next time.