https://www.bestcpmnetwork.com/wm8r0f4h?key=71e22323cafc6f23c987737c78d66ca2 Dan's Gardening and Birding Blog

Friday, July 25, 2014

From Tree Stump to Perennial Flower Bed

Welcome back.

This week my post will be a little different from the norm for me.  Recently we had a large blue spruce tree cut down in our yard since it was growing too close to our swimming pool, creating a huge mess in the pool after storms and on windy days.  After the tree was cut, we decided to make a perennial flower bed where the tree was.  One obstacle remained:  the tree stump.


Instead of having it ground down which can be quite expensive, I decided to try another method.  I thought maybe I could burn it down to at least ground level, then mound soil up around it to create a flower bed. Over the years, the pine needles under the tree had decayed, therefore, there was already a good amount of rich soil already there.

I started by placing some tin and a few stones around the stump to confine the fire.  I then piled on some charcoal and got that burning.  Later on I added some firewood and let it burn for 24 hours, adding more wood as needed.


Stump Removal


Unfortunately I didn't take a photo of the end result since at the time I didn't plan on writing a post about it. About three quarters of the stump burned down to ground level.   I got the best result from where I placed the charcoal.  I could have started another charcoal fire to completely  level the stump, but I decided not to since 24 hours of smoke was enough.  I thoroughly soaked what was left to make sure all of the coals were extinguished.

The other night we planted the perennials that we had purchased a few weeks ago.  Before planting, I added a few wheelbarrow loads of potting soil that we had left over from planting flower containers on the deck earlier this summer.  The remaining stump will decompose over time thus adding to the character of the soil.

The varieties we planted are as follows.  These photos are not of the actual plants that we planted, but are shown so you can get a detailed look at the different varieties.


Nano Purple Butterfly Bush


Zagreb Coreopsis


Flame Coral Phlox


Peridot Ice Plant


Prairie Splendor Coneflower


Snowcap Shasta Daisy


Topaz Ice Plant


Pow Wow White Coneflower


Pink Dianthus


Before planting, it is always a good idea to just place them on top of the ground to determine how the spacing will look.  Using groups of perennials is one technique to use and that is what we used this time. We ended up placing the two butterfly bushes in the center since they will be the tallest and largest plants.


Ready to Plant

Spacing and Grouping

Final Result

Although the plants look somewhat wilted, they will perk up with time and fill in this bed nicely.  I will also add more mulch as I didn't have as much as there really should be.  I will keep you updated on the progress of this flower bed.

In my next post I will cover some of the veggies I am now starting to harvest.  Until next time.


Tuesday, July 15, 2014

Tomato Blight

Welcome back and as always, thanks for reading.

As promised, I am writing a post about tomato blight.You probably have heard about early blight, late blight, and more.  In this post I will try to break them down and provide prevention and control tips.

Over the last few weeks, I have noticed that my tomato plants have developed some early blight.  Although this can be a little discouraging, this is not unusual at this point in the gardening season.  Both types of blight thrive in warm and humid conditions.

Early blight occurs at this time of the growing season.  Late blight occurs later on as the name implies. These two blights are caused by different organisms, both of which are fungi.

The differences are very well explained on the following site: http://organicgardening.about.com/b/2009/07/05/diagnosing-tomato-diseases-is-it-early-blight-late-blight-or-septoria.htm

As mentioned above, these two types of blight are caused by two different fungi.  Early blight is caused by the fungus Alternaria solani and usually appears as tan colored spots with concentric rings on the tomato leaves and also as dark sunken spots on the stem end of the tomatoes themselves.  This blight will ultimately turn the leaves and stems yellow as they die.  It normally occurs on the bottom of the plants, therefore it can be controlled organically by removing the bottom affected stems and leaves.

Early Blight/Will Also Turn Stems Yellow

Blight can also be controlled by using a copper or sulfur based  based fungicidal spray or even a baking soda spray.  For more information, refer to the following link: http://www.veggiegardener.com/tips-for-preventing-and-treating-tomato-blights/

Late blight, however, is more likely to kill the entire plant.  This blight is caused by the fungus Phytophthora infestans and appears as brown/black spots on the leaves and also fuzzy mold on the underside of the leaves. Unlike the early blight, late blight usually appears on the upper leaves and stems first.  This type of blight will affect the entire plant and also the tomatoes themselves.  It is recommended that you pull and destroy plants affected by the late blight.  It is best to bag them and dispose of them with your trash.  Do not place them on your compost pile or rototill them into the garden in the fall.as the fungus can survive the winter.


Late Blight


Blight Prevention Tips:


  • Try to rotate your crops every year so as not to plant your tomatoes in the same spot every year.
  • Do not plant tomatoes and potatoes near each other as potatoes can be affected by blight also.
  • Leave adequate space between tomato plants for better air flow.
  • Dispose of blight affected leaves/plants.  Do not compost them or rototill them into the soil in the fall.
  • Use a copper or sulfur fungicidal spray or baking soda spray to prevent blight. 

Finally some more photos from my garden:

Potato Blossoms

Sunflowers

Green/Yellow Beans and Indian Corn

Until next time.


Tuesday, July 8, 2014

The Garden is Thriving/Duck Photos

Welcome back.  This week I thought I would just post some photos and take a break from my normal post. So far in July we've gotten almost 3 inches of rain in only 8 days.  That combined with plenty of warm sunny periods has made the garden "go wild".  The changes can be seen daily.

Enjoy the photos.

The Lettuce/Chard Patch


The Lower Garden


The Pumpkin Patch


Tomato Blossoms

I have more photos to share next time.  Also, I plan on writing a post about tomato blight and what can be done to prevent/control it.

Finally, a photo of some ducks that I found in my yard.....actually my pets.  They are Khaki Campbells, two pairs.  They are very entertaining to say the least.  Here they are just resting.  Oh, the life!

Until next time.


The Foursome


Tuesday, July 1, 2014

Tomato Blossoms/Picking Peas/Mystery Bird

Hi everyone and welcome back.

The garden has been doing extremely well especially during the last few weeks of June as a result of the hot weather and adequate rainfall.  We received 6 inches of rain in June, which I believe is actually above normal for this area.  A garden usually gets to a stage in later June where it really starts to thrive.  That time has arrived.


Tomato Update:

The tomatoes are growing in leaps and bounds as is the rest of the garden, and are now in blossom.  Upon closer inspection, I discovered my first green tomato on one of my heirloom plants.  However, within a week or so there will be many more tomatoes forming.  So far I haven't seen any evidence of blight, which has been prevalent in this area for the last 4 or 5 years. There are measures you can take to help prevent and/or control  the blight on tomato and potato plants.  I will discuss this topic in future posts.


For those of you who haven't read my previous blog entries regarding which tomato varieties I planted this year, I covered this information in my entries of March 25, 2014 (http://dansgardening.blogspot.com/2014/03/its-tomato-starting-time.html) and April 7, 2014 (http://dansgardening.blogspot.com/2014/04/planting-more-tomatoes-more-heirlooms.html).

Peas:

A few days ago, I picked my first batch of snap peas.  This year I planted one 15 foot row since I haven't planted them in a few years.  I haven't always had good luck growing peas, however this year has turned out to be a good year.

I planted the peas about one inch deep along a 30 inch high fence.   Peas need the support of a fence or trellis, some varieties can grow as high as 5 to 6 feet.

I gave the first small batch to my daughter, hopefully the next batch will be a little larger in a few days.


Oregon Sugar Pod Peas

For more information on planting peas, see my post from May 2, 2014 (http://dansgardening.blogspot.com/2014/05/planting-peasa-visit-from-great-blue.html).

Mystery Bird - Help Me ID This Species:

Finally, a week ago or so I saw a different bird at my feeder and on the lawn that I struggled to ID.  It has been hanging around and I see it daily.  I'm usually pretty good at species identification since I have been a bird watcher since I was 10 or 12 years old.  Take a look at the photos below and let me know what you think.  I have never seen this bird or at least have never noticed it.  I will write my guess at the end of the post:

Mystery Bird


Mystery Bird
Let me know what you think. Remember, I live in central New York State.

My guess is:


?


?


?


?


?


?


?


?


?


?

Brown Thrasher.  Right or wrong?  Let me know.


Until next time


Monday, June 23, 2014

Sunflowers and Nesting Tree Swallows

Welcome back.

A week or so before the end of May, I planted another personal favorite of mine, sunflowers.  I have enjoyed growing sunflowers since I was 8 or 10 years old, and it was what got me hooked on gardening. Of course, I owe the majority of my love for gardening to my Mom & Dad, as well as my grandparents.

With my Mom's help, I started growing sunflowers to enter mail-in contests for the largest seed heads. Back then, I grew mostly the Russian Mammoth variety, which are known for producing enormous heads. Of course growing the sunflowers for seeds was related to another hobby of mine that I started at a young age also:  bird watching.

Russian Mammoth Sunflowers

The sunflowers I usually plant now are the decorative type.  They take up less space and provide a great variety of color when they bloom.  There are many varieties to choose from these days.  What I have been doing the past several years is mixing a few varieties together to create a great assortment of colors.  This year I used the and Evening Sun and Autumn Beauty varieties, which are common ones available at most stores that sell seeds:


Evening Sun Sunflower

Autumn Beauty Sunflower

The seeds germinated well and the plants have been progressing nicely.  The other day I thinned/moved some of them around as to ensure they are evenly spaced.  I always plant extra seeds in case they don't germinate well.  Ideally the plants should be about a foot apart, however in this case they ended up about 6 or 8 inches apart.  This will create a nice thick grouping.


The Sunflower Crop

Moving Sunflowers

Moving Sunflowers

Sunflower Patch is Complete

The sunflowers are at the point now where they will grow quickly.  They are currently about 6 inches tall.
If you want to grow the Russian Mammoth or other seed variety, I would recommend spacing them further apart as those types are much larger and require more space.

Finally, I was able to get a fairly good photo of a tree swallow.  As promised in an earlier posts, I said I would talk about the nesting boxes I have on my property.  I have 10 total, 3 of which are near the pond, spaced about 50 feet apart.  Every year these 3 bird houses are inhabited by tree swallows.

The tree swallows are fascinating to watch.  They frequently skim across the surface of the pond in search of insects, and are very acrobatic.  They also are fairly tame, as I was able to get pretty close to this  one:

Male Tree Swallow

Until next time, thanks as always for reading.


Wednesday, June 18, 2014

Potato Update Sweet and Otherwise

Welcome back,

This year I decided to plant a few sweet potatoes as an experiment to see how well they would grow in this area.  I have only tried to grow them once before, quite a few years ago, without success.  I may have planted them too early in the season as sweet potato plants are sensitive to cool temperatures.

I ordered them from the Jung Seed Company.  The variety I decided to try is Centennial, described as follows:

America's leading sweet potato for northern climates. Sturdy field-grown plants mature early before frosts. Bright copper skin with deep orange flesh. Fine-grained, moist and delicious when baked.


Centennial Sweet Potato

Unlike regular potatoes that are planted as seed potatoes, sweet potatoes are started as plants.  The live plants are shipped at the time that is appropriate for planting in your area.  They may be wilted when you receive them but this is normal.  The plants are very hardy and will survive the shipping process.

I planted them in a small garden I have down behind our pond.  It's just a little spot where I usually plant a few extra tomatoes (imagine that!) or whatever i have extra of.

I planted them about 6 inches deep and about a foot apart.  I then gave them adequate water and protected them with wood shingles until they get adjusted to the hot sun and outside conditions.


Sweet Potato Plants

The Plot is Ready

Sweet Potato Plants


All Finished

Back in the main garden, the "regular" potatoes are coming up nicely.  An important step in growing potatoes is "hilling."  It is a process of loosening the dirt around the plants, then mounding up the dirt to a height of about 8 to12 inches to give the potatoes plenty of soil to develop in without being exposed to the sun.  If the plants aren't hilled properly, many of the potatoes will be above ground and will turn green as they are exposed to light.

Hilling the Potatoes

The final step is to add grass clippings or some other mulching material,  This isn't absolutely necessary but it cuts down on weeding tremendously, holds the moisture in the ground, plus keeps the soil from baking hard in the sun.

Mulching With Grass Clippings

Note:  I ended up planting a third variety of potato in addition to Kennebec and Yukon Gold.  For more information on these two varieties and planting, see my post of May 30, 2014 (http://dansgardening.blogspot.com/2014/05/in-with-potatoes.html).

The new variety I am trying this year is an heirloom called German Butterball.  I ordered these from the Jung Seed Company.

German Butterball Potato
This superb potato says 'butter' and it's better than excellent. It has yellow, slightly flaky, melt-in-your-mouth flesh with butter-rich flavor. One taste and you'll know why it won first place in Rodale's Organic Gardening 'Taste-Off' contest. Disease-resistant plants produce high yields of large, round to oblong tubers with lightly netted golden skin. A good keeper. Late season.

I am looking forward to trying these!

In my next post I will talk about planting peppers and an update on all of the delicious greens we are enjoying.

Thanks for reading.


Tuesday, June 10, 2014

The Tomatoes Are Planted/Killdeer Photo

Welcome back.

Over the last few weeks I have been gradually planting what I consider to be the "main attraction" in my garden: the tomatoes.  All the tomato lovers out there will know what I mean.


Each year I look forward to starting the plants from seed, nursing them along until they reach garden size, and ultimately transplanting them into the garden. It's fun to chose the varieties you like and to experiment with different ones, especially now in the age of heirloom tomatoes.

Planting tomatoes is a fairly simple process, now that the soil has been prepared for some time now.  One of the most important factors to consider when planting tomatoes is temperature.  After many years of experience, I have learned not to plant them too early in the season.  It is better to wait a few weeks to ensure that the weather will remain consistently warm for the season.  Here in central NY State, it is best to wait until late May or early June.  

The first step is to dig small holes about six inches deep in which to place the plants.  My plants are currently in 3 inch peat pots, so the hole should be large enough to accommodate those, and deep enough to provide enough support to the stems.  This year I am placing composted manure in the holes to mix with the soil.

Preparing to Plant Tomatoes


Mixing in Composted Manure

Next, simply place the tomato plant in the hole.  I normally peel off the bottom of the peat pot to make it easier for the roots to grow.  This step isn't necessary as the roots will grow through the peat pot as it decomposes in the soil.


Make sure to fill in enough dirt around the plants to ensure adequate support of the stems. Also be sure to water them to ease the shock of transplanting.

To provide additional support, I use tomato cages that support the plants as they grow.  Proper support is especially important as the pants develop tomatoes.  They become heavy and will topple if not supported. The tomato cages are fairly inexpensive and can be use for many seasons.


Placing Tomato Cages

Another step that I add to ensure that the plants are protected is placing wood shingles around them. This is an old school technique that provides both shading and wind protection for the new transplants.  I typically will remove these after a couple of weeks.  I first talked about using the wood shingles in my post on May 10, 2014 (http://dansgardening.blogspot.com/2014/05/planting-more-early-season.html).


Wood Shingle Protection

The final step is to add grass clippings or some form of mulch around the plants.  This step is optional of course, but I find it cuts down tremendously on the weeding and also keeps the ground moist throughout the summer.


The Tomatoes Are Planted!

By now you are probably wondering which tomato varieties I transplanted.  The varieties I started this year from seed were detailed in my posts on March 25, 2014 (http://dansgardening.blogspot.com/2014/03/its-tomato-starting-time.html) and April 7, 2014 (http://dansgardening.blogspot.com/2014/04/planting-more-tomatoes-more-heirlooms.html).

The actual varieties that I have transplanted thus far are:

Artisan from the Jung Seed Company:
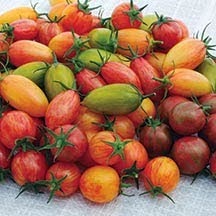
Artisan Tomaoes


Unique Appearance - Exceptional Flavor
Whether you're a master chef or a home cook, you'll love all the options these tomatoes bring to the table. The breeders of Artisan's focused on combining excellent flavor with unique colors and shapes. The results are these beautiful and tasty, round and elongated, striped and blushed cherry-type fruits that range from 1.5 to 2 inches in size, resist cracking and keep well. Indeterminate plants stay healthy and extremely productive over an extended period.


Grappoli Carbarino, an Italian bunching and paste tomato:


Grappoli Carbarino


Heirloom Rainbow Blend, from Park Seeds:


Contains Aunt Ruby's German Green, Dixie Golden Giant, Black from Tula, Brandywine Red, Big Rainbow, and Cherokee Purple.

Cherokee Purple:

Cherokee Purple - an old Cherokee Indian heirloom, pre-1890 variety; beautiful deep dusky purple-pink color, superb sweet flavor, and very large sized fruit. Try this one for real old-time tomato flavor.

Big Rainbow:


Big Rainbow - the flesh inside is marbled with red in the bottom half of the fruit. It has a big, lumpy beefsteak shape with a very mild and sweet flavor. It's a knockout on a platter with slices of other tomato varieties. The large fruits (often 22 oz.) are borne on tall plants.

If I find room in the garden I may try to squeeze a few more plants in!  However, I'm rapidly running out of gardening space as is usually the case every year.

Finally, as promised, a photo of a Killdeer that I spotted on the lawn last weekend.  These are interesting birds, a member of the plover family.  They are know for there signature run-stop, run-stop behavior as they try to stir up bugs to eat as they run.  We usually have a pair every summer.

Killdeer


Until next time.  Thanks for reading.